学习一下如何使用 LibAFL 来实现对 binary-only 的 socket 进行 fuzz。
baby_fuzzer of LibAFL-QEMU 首先阅读 LibAFL 提供的 LibAFL-QEMU 的几个实例 ,由于 frida_mode 目前相较于 qemu_mode 功能仍有所欠缺,我们仅考虑 qemu 模式。官方给的几个例子中 qemu_launcher 是比较完整可以直接拿来用的。just run 即可,其脚本会自动下载 libpng 的库并编译 harness 来进行 fuzz。
1 2 3 4 5 6 7 8 9 10 11 12 13 14 15 16 17 18 19 20 21 #include <stdlib.h> #include <string.h> #include <unistd.h> extern "C" int LLVMFuzzOneTestInput (const char *buf, size_t len) char bof_buf[0x4 ]; if (len > 0x100 ) { return 1 ; } if (buf[0 ] == 'a' ) { if (buf[1 ] == 'b' ) { if (buf[2 ] == 'c' ) { strcpy (bof_buf, buf); } } } return 0 ; } int main () char buf[0x100 ]; size_t len = 0 ; LLVMFuzzOneTestInput (buf, len); return 0 ; }
这里对应要修改 harness.rs 文件中的 hook 符号以及写入的参数,似乎要 extern “C” 防止符号名被修改。
1 2 3 4 5 6 7 8 9 10 11 12 13 14 15 16 17 18 19 fn start_pc (qemu: Qemu) -> Result <GuestAddr, Error> { let mut elf_buffer = Vec ::new (); let elf = EasyElf::from_file (qemu.binary_path (), &mut elf_buffer)?; let start_pc = elf .resolve_symbol ("LLVMFuzzTestOneInput" , qemu.load_addr ()) .ok_or_else (|| Error::empty_optional ("Symbol LLVMFuzzTestOneInput not found" ))?; Ok (start_pc) } ... self .qemu .write_function_argument (0 , self .input_addr) .map_err (|e| Error::unknown (format! ("Failed to write argument 0: {e:?}" )))?; self .qemu .write_function_argument (1 , len) .map_err (|e| Error::unknown (format! ("Failed to write argument 1: {e:?}" )))?;
编译命令如下:
1
2
3
x86_64-linux-gnu-g++ \ ./harness_test.cc \ -o test-harness-release
最终 fuzz 运行的命令,把 cores 缩减为了两个(这里笔者发现如果只用一个核 fuzz 会卡死不动,可能是进程调度的问题,有师傅懂的话可以回答解惑一下 orz)。
1
2
3
4
5
6
7
8
LibAFL/fuzzers/binary_only/qemu_launcher/target/release/qemu_launcher \ --input ./corpus_test \ --output LibAFL/fuzzers/binary_only/qemu_launcher/target/output/ \ --log LibAFL/fuzzers/binary_only/qemu_launcher/target/output/log.txt \ --cores 0-1 --asan-host-cores 0 --cmplog-cores 1 \ --iterations 1000000 \ -- \ LibAFL/fuzzers/binary_only/qemu_launcher/test-harness-release
然后应该很快就会出现 crash。
调试 github repo 里有个 LibAFL_QEMU 调试的 issue ,刚好借此学习下如何对其做调试。
See this example:
simplemgr 在 fuzzer.rs 中已经提供了相应的实现逻辑,只需要添加 simplemgr 的 feature 即可,同时其会自动设置单核。
1
2
3
4
5
6
#[cfg(feature = "simplemgr" )] return client.run ( None , SimpleEventManager::new (monitor.clone ()), ClientDescription::new (0 , 0 , CoreId (0 )), );
看 option.rs 是需要提供 -r <path> 参数
1 cargo build --release --features simplemgr
调试时还可以设置环境变量 LIBAFL_FUZZBENCH_DEBUG 来重新启用 stderror。
1 2 3 4 5 6 7 8 9 if std::env::var ("LIBAFL_FUZZBENCH_DEBUG" ).is_ok () { unsafe { dup2 (new_stderr, io::stderr ().as_raw_fd ())?; } }
添加 socketfuzz hook 对于建立 socket 连接的 binary 的输入,如果不作修改直接去建立 socket 连接进行 fuzz 会由于 socket 本身导致 fuzz 速率下降,并且需要额外修改 harness。这里我们采用添加 自定义库 来 hook socket 相关函数的方法。socketfuzz.c 逻辑,复制下来。
1 2 3 4 5 6 7 8 9 10 11 12 13 14 15 16 17 18 19 20 21 22 23 24 25 26 27 28 29 30 31 32 33 34 35 36 37 38 39 40 41 42 43 44 45 46 47 48 49 50 51 52 53 54 55 56 57 58 59 60 61 62 63 64 65 66 67 68 69 70 71 72 73 74 75 76 77 78 79 80 81 82 83 84 85 86 87 88 89 90 91 92 93 94 95 96 97 98 99 100 101 102 #define _GNU_SOURCE #include <stdio.h> #include <stdlib.h> #include <unistd.h> #include <string.h> #include <sys/types.h> #include <sys/socket.h> #include <sys/stat.h> #include <fcntl.h> #include <netinet/in.h> #include <pthread.h> #include <signal.h> #include <dlfcn.h> #include <errno.h> #include <stdio.h> #include <poll.h> int (*original_close)(int );int (*original_dup2)(int , int );int (*original_read)(int , void *, size_t );__attribute__((constructor)) void preeny_desock_dup_orig () { original_close = dlsym(RTLD_NEXT, "close" ); original_dup2 = dlsym(RTLD_NEXT, "dup2" ); original_read = dlsym(RTLD_NEXT, "read" ); } int close (int sockfd) { if (sockfd <= 2 ) { fprintf (stderr , "Info: Disabling close on %d\n" , sockfd); return 0 ; } else { return original_close(sockfd); } } int dup2 (int old, int new) { if (new <= 2 ) { fprintf (stderr , "Info: Disabling dup from %d to %d\n" , old, new); return 0 ; } else { return original_dup2(old, new); } } int accept (int sockfd, struct sockaddr *addr, socklen_t *addrlen) { (void )sockfd; (void )addr; (void )addrlen; fprintf (stderr , "Info: Emulating accept on %d\n" , sockfd); return 0 ; } int bind (int sockfd, const struct sockaddr *addr, socklen_t addrlen) { (void )sockfd; (void )addr; (void )addrlen; fprintf (stderr , "Info: Emulating bind on port %d\n" , ntohs(((struct sockaddr_in *)addr)->sin_port)); return 0 ; } int listen (int sockfd, int backlog) { (void )sockfd; (void )backlog; return 0 ; } int setsockopt (int sockfd, int level, int optid, const void *optdata, socklen_t optdatalen) { (void )sockfd; (void )level; (void )optid; (void )optdata; (void )optdatalen; return 0 ; } ssize_t LLVMFuzzTestOneInput (char *buf, size_t data) { return data; } ssize_t read (int fd, void *buf, size_t count) { if (fd != 0 ) { return original_read(fd, buf, count); } return LLVMFuzzTestOneInput(buf, count); }
然后直接 make 即可获取到32位以及64位的 so 库。
1 2 3 4 5 6 7 8 9 10 11 12 13 14 15 16 17 18 19 20 21 22 23 24 #include <stdlib.h> #include <string.h> #include <unistd.h> int vuln (char *buf, size_t len) { char bof_buf[0x4 ]; read(0 , buf, len); if (len > 0x100 ) { return 1 ; } if (buf[0 ] == 'a' ) { if (buf[1 ] == 'b' ) { if (buf[2 ] == 'c' ) { strcpy (bof_buf, buf); } } } return 0 ; } int main () { char buf[0x100 ]; size_t len = 0 ; vuln(buf, len); return 0 ; }
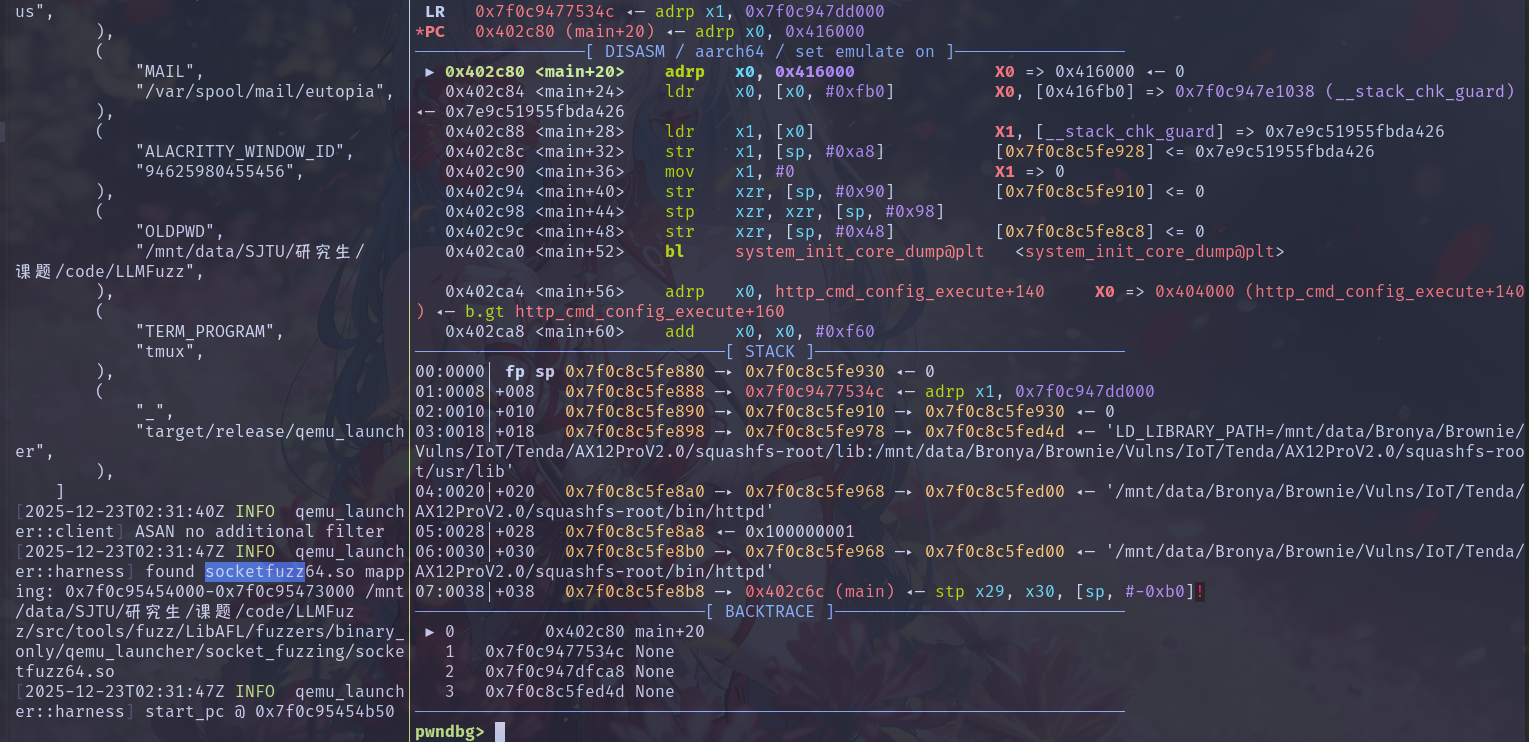
然后由于 LLVMFuzzTestOneInput 函数被我们搞到了 so 库里,这里我们修改 qemu_launcher 的 harness.rs 逻辑,令其先运行到 main 函数加载好所有共享库后,找到 socketfuzz64.so 获取其地址然后解析 LLVMFuzzTestOneInput 符号即可(这样可以方便后续的功能)。
1
2
3
4
5
6
7
8
9
10
11
12
13
14
15
16
17
18
19
20
21
22
23
24
25
26
27
28
29
30
31
32
33
34
35
36
37
38
39
40
41
42
43
44
45
46
47
48
49
50
51
52
53
54
55
56
57
58
59
60
61
62
63
64
65
66
67
68
69
70
71
72
73
74
75
76
77
78
79
80
81
base ❯ diff ./harness_ori.rs ./src/harness.rs 29a30 > // we run target binary to main first 31a33,72 > let main_pc = elf > .resolve_symbol("main", qemu.load_addr()) > .ok_or_else(|| Error::empty_optional("Symbol Main not found"))?; > > qemu.entry_break(main_pc); > > // enumrate all shared library > let maps = qemu.mappings(); > > let mut so_base: Option<GuestAddr> = None; > let mut so_path: Option<String> = None; > > for m in maps { > if let Some(path) = &m.path() { > if path.contains("socketfuzz64.so") { > log::info!( > "found socketfuzz64.so mapping: {:#x}-{:#x} {}", > m.start(), > m.end(), > path > ); > so_base = Some(m.start()); > so_path = Some(path.to_string()); > break; > } > } > } > > let so_base = so_base > .ok_or_else(|| Error::empty_optional("socketfuzz64.so not found in memory mappings"))?; > > let so_path = so_path.unwrap(); > > let mut so_buf = Vec::new(); > let so_elf = EasyElf::from_file(&so_path, &mut so_buf)?; > let fuzz_pc = so_elf > .resolve_symbol("LLVMFuzzTestOneInput", so_base) > .ok_or_else(|| { > Error::empty_optional("Symbol LLVMFuzzTestOneInput not found in socketfuzz64.so") > })?; 33,36c74 < let start_pc = elf < .resolve_symbol("LLVMFuzzerTestOneInput", qemu.load_addr()) < .ok_or_else(|| Error::empty_optional("Symbol LLVMFuzzerTestOneInput not found"))?; < Ok(start_pc) > Ok(fuzz_pc) 46,50c84,88 < let ret_addr: GuestAddr = qemu < .read_return_address() < .map_err(|e| Error::unknown(format!("Failed to read return address: {e:?}")))?; < log::info!("ret_addr = {ret_addr:#x}"); < qemu.set_breakpoint(ret_addr); > let end_pc: GuestAddr = qemu.load_addr() + 0x00000000000011F3; > log::info!("end_pc = {end_pc:#x}"); > // we not consider for now, when qemu execute here it will panic, we need to add check > // logic. This config will exit early to narrow down fuzz scope. > // qemu.set_breakpoint(end_pc); 115c153 < > /* 118a157,169 > */ > // we need to copy content to &buf instead overwrite &buf to &input_addr > let target_addr: GuestAddr = self > .qemu > .read_function_argument(0) > .map_err(|e| Error::unknown(format!("Failed to read argument 0: {e:?}")))?; > > self.qemu.write_mem(target_addr, buf).map_err(|e| { > Error::unknown(format!( > "Failed to write to memory@{:#x}: {e:?}", > target_addr > )) > })?;
由于我们已知 qemu_launcher 适配 qemu 的原始命令,这里我们可以尝试传入 LD_PRELOAD 环境变量。
1
2
3
4
5
6
7
8
9
LibAFL/fuzzers/binary_only/qemu_launcher/target/release/qemu_launcher \ --input ./corpus_test \ --output LibAFL/fuzzers/binary_only/qemu_launcher/target/output/ \ --log LibAFL/fuzzers/binary_only/qemu_launcher/target/output/log.txt \ --timeout 1000000 \ -- \ -E LD_PRELOAD=./socket_fuzzing/socketfuzz64.so \ -g 1234 \ LibAFL/fuzzers/binary_only/qemu_launcher/test-harness-release
实战 针对之前分析过的 Tenda AX12 Pro V2.0 做实验。
1
2
3
4
5
6
7
8
9
# network bridge config sudo brctl addbr br0 sudo ip addr add 192.168.2.1/24 dev br0 sudo ip link set br0 up # start cfg server python uds_server.py socat UNIX-LISTEN:./squashfs-root/var/cfm_socket,fork,reuseaddr,unlink-early TCP:127.0.0.1:8888 # start httpd sudo chroot . ./qemu-aarch64-static -E PATH=/usr/bin:/bin ./bin/httpd --debugger --verbose --home webroot
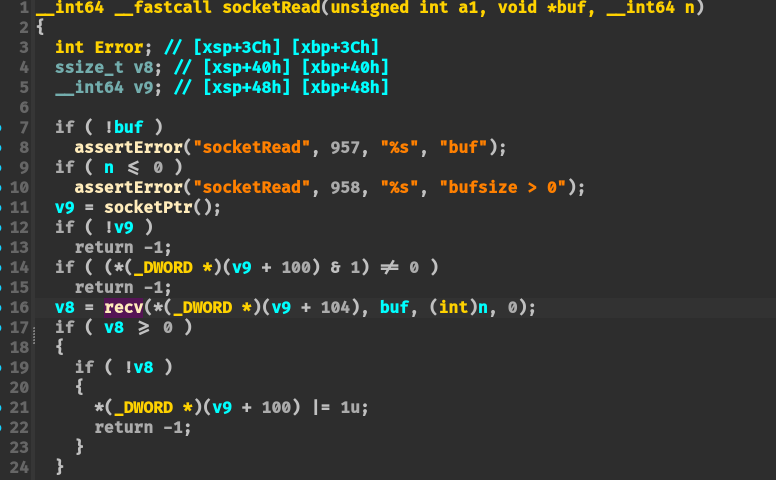
问题1:httpd 会与其他本地的 socket 建立连接,如果都采取 hook 的方式,是否会引起错误;
怀疑其调用链如下:
1
2
3
main-> WebsListen -> WebsAccept->socketEvent->readEvent->websRead->socketRead -> recv
因此需要 hook recv 函数的逻辑:
1
2
3
ssize_t recv (int fd, void *buf, size_t len, int flags) { return LLVMFuzzTestOneInput(buf, len); }
然后我们交叉编译 aarch64 架构的 socketfuzz64.so 库
1
2
# 编译 64 位 ARM (aarch64) aarch64-linux-gnu-gcc -fPIC -Wall -Wextra -shared socketfuzz.c -o socketfuzz_arm64.so -ldl
编译 aarch64 版本的 libAFL qemu-launcher 版本:
1 CFLAGS="-Wno-error=stringop-overflow -Wno-error=format-overflow" cargo build --release --features simplemgr --features aarch64
然后运行命令验证(这里我把socketfuzz_arm64.so重命名回了socketfuzz64.so,因为重新编译qemu_launcher耗时太久了QWQ):
1
2
3
4
5
6
7
8
9
LibAFL/fuzzers/binary_only/qemu_launcher/target/release/qemu_launcher \ --input ./corpus_test \ --output LibAFL/fuzzers/binary_only/qemu_launcher/target/output/ \ --log LibAFL/fuzzers/binary_only/qemu_launcher/target/output/log.txt \ --timeout 1000000 \ -- \ -E LD_PRELOAD=./socket_fuzzing/socketfuzz64.so \ -g 1234 \ <path_to_httpd>
发现没找到 main 函数 XD:
这里我们设置固定地址查看发现能够顺利运行:
LibAFL EasyELF 类型内定义了 load_entrypoint() 函数,可以直接获取 _start 函数的地址。
然后发现报错:
原因应该是在 websAccept 函数中传入的 ipaddr 为空,这里传入的参数都为空。socketfuzz.c 的逻辑过于简单,少实现了 accept 的逻辑,因此修改后代码如下:
1 2 3 4 5 6 7 8 9 10 11 12 13 14 15 16 17 18 19 20 21 22 23 24 25 26 27 28 29 30 31 32 33 34 35 36 37 38 39 40 41 42 43 44 45 46 47 48 49 50 51 52 53 54 55 56 57 58 59 60 61 62 63 64 65 66 67 68 69 70 71 72 73 74 75 76 77 78 79 80 81 82 83 84 85 86 87 88 89 90 91 92 93 94 95 96 97 98 99 100 101 102 103 104 105 106 107 108 109 110 111 112 113 114 115 116 117 118 119 120 121 122 123 124 125 126 127 128 129 130 131 #define _GNU_SOURCE #include <stdio.h> #include <stdlib.h> #include <unistd.h> #include <string.h> #include <sys/types.h> #include <sys/socket.h> #include <sys/stat.h> #include <fcntl.h> #include <netinet/in.h> #include <pthread.h> #include <signal.h> #include <dlfcn.h> #include <errno.h> #include <stdio.h> #include <poll.h> #include <arpa/inet.h> int (*original_close)(int );int (*original_dup2)(int , int );int (*original_read)(int , void *, size_t );__attribute__((constructor)) void preeny_desock_dup_orig () { original_close = dlsym(RTLD_NEXT, "close" ); original_dup2 = dlsym(RTLD_NEXT, "dup2" ); original_read = dlsym(RTLD_NEXT, "read" ); } int close (int sockfd) { if (sockfd <= 2 ) { fprintf (stderr , "Info: Disabling close on %d\n" , sockfd); return 0 ; } else { return original_close(sockfd); } } int dup2 (int old, int new) { if (new <= 2 ) { fprintf (stderr , "Info: Disabling dup from %d to %d\n" , old, new); return 0 ; } else { return original_dup2(old, new); } } int accept (int sockfd, struct sockaddr *addr, socklen_t *addrlen) { (void )sockfd; (void )addr; (void )addrlen; struct sockaddr_in *client_addr =struct sockaddr_in *)addr; memset (client_addr, 0 , sizeof (struct sockaddr_in)); client_addr->sin_family = AF_INET; client_addr->sin_addr.s_addr = inet_addr("127.0.0.1" ); client_addr->sin_port = htons(0x1337 ); fprintf (stderr , "Info: Emulating accept fd=%d, client ip 127.0.0.1, port 1337\n" , sockfd); return 0 ; } int bind (int sockfd, const struct sockaddr *addr, socklen_t addrlen) { (void )sockfd; (void )addr; (void )addrlen; struct sockaddr_in *in =struct sockaddr_in *)addr; int port = 0 ; char ipstr[0x100 ] = {0 }; inet_ntop(AF_INET, &in->sin_addr, ipstr, sizeof (ipstr)); port = ntohs(in->sin_port); fprintf (stderr , "Info: Emulating bind on sockfd %d, ip %s, port %d\n" , sockfd, ipstr, port); return 0 ; } int listen (int sockfd, int backlog) { (void )sockfd; (void )backlog; return 0 ; } int setsockopt (int sockfd, int level, int optid, const void *optdata, socklen_t optdatalen) { (void )sockfd; (void )level; (void )optid; (void )optdata; (void )optdatalen; return 0 ; } int getsockname (int sockfd, struct sockaddr *restrict addr, socklen_t *restrict len) { (void )sockfd; (void )addr; (void )len; memset (addr, 0 , sizeof (struct sockaddr)); ((struct sockaddr_in *)addr)->sin_family = AF_INET; ((struct sockaddr_in *)addr)->sin_addr.s_addr = inet_addr("192.168.2.1" ); ((struct sockaddr_in *)addr)->sin_port = htons(1337 ); *len = sizeof (struct sockaddr); return 0 ; } ssize_t LLVMFuzzTestOneInput (char *buf, size_t len) { return len; } ssize_t read (int fd, void *buf, size_t count) { if (fd != 0 ) { return original_read(fd, buf, count); } return LLVMFuzzTestOneInput(buf, count); } ssize_t recv (int fd, void *buf, size_t len, int flags) { return LLVMFuzzTestOneInput(buf, len); }
然后就可以发现能够正常进入 recv 函数,但是这里调用 LLVMFuzzTestOneInput 函数会直接退出,怀疑是 qemu_launcher 与 gdb 争夺控制权的问题。相关 issue
然后还有一个问题就是 snapshot_module 在保存内存时可能会出现 SIGBUS error。gpt说这个好像是因为mmap时会为了页对齐往往会分配一个更大的页,导致后面地址没有实际内容但是又映射,从而在读取时出现 SIGBUS error,这里先关闭了 snapshot_module,可以成功运行。
但是发现在执行一次后会直接crash,怀疑是 in-process executor 导致 reset 状态未恢复完全的问题。
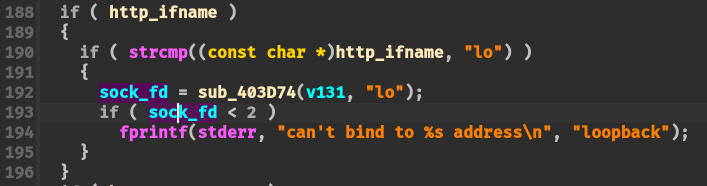
Another Solution 如下图是 ASUS RT-N56U 的固件 main 函数中创建 socket 的逻辑,其会判断返回 fd 是否小于2,如果我们是将其修改为 0 则会直接错误,虽然这里没有退出,但感觉以上述做法还是不是很优雅。
这里我们再看 seebug 最近发的一篇博客 ,学习一下其思路。
1
2
3
4
5
6
7
8
... sockfd = create_socket(); ... stream = fdopen(sockfd, "r+" ); if (!fgets(request_data_buf, 10000 , (FILE *)::stream)) { ... } ...
该文章没有放出完整代码,在这里记录一下其流程:
编写harness.so,该库文件用于劫持 uClibc_main 函数,令其调用自定义的 main 函数,该函数则是通过 memfd_create 创建可读写的文件描述符来提供 hook 掉输入;
编译安装 soft_nvram.ko 内核驱动,将(大概是真机上拿到的)nvram 配置信息加载到模拟主机上;
patch qemu 添加 nvram IOCTL 逻辑;
使用 QEMU 10.x
参考链接