LibAFL 工具使用
学习 libAFL 工具的一些基本使用方法。
环境
- Ubuntu 22.04
- clang
- rust
- LibAFL 源码
首先从 github 下载 LibAFL 源码:1
git clone https://github.com/AFLplusplus/LibAFL.git
教程建议安装 mdbook 然后查看 repo 的版本。
1 | cd ./libAFL/docs |
编译运行
编译 LibAFL
直接使用 cargo 运行以下命令即可(Debug mode 要比 release mode 慢 10 倍以上):
1 | cargo build --release |
编译 fuzzer 示例
在 ./fuzzers/<Fuzzer_name> 目录下执行 cargo build --release 命令
Crates
LibAFL 包含各种部件,自身也是。因此可以直接在自己的项目 Cargo.toml 中添加 libafl 依赖即可:
1 | [dependencies] |
子部件
libafl
主 crate。编译 fuzzer 必备。
该组件中有一些 feature flags 由 libafl 的 cargo.toml [features] 控制(github链接已经 404),下面是一些比较重要的 features:
- std:启用使用 rust 标准库的代码部分,否则其是 no-std 兼容的(为了在 嵌入式设备 内运行)
- derive:启用 libafl_derive 中 derive(…) 代码
- rand_trait:使用 LibAFL 的随机数生成器(效率高但不安全)
- llmp_bind_public:将 LibAFL 的 LLMP 暴露在 tcp 端口,方便其他 fuzzer 节点进行通信
- introspection:增加 性能统计信息
默认启用 std, derive, rand_trait 三个,可以通过在 cargo.toml 中 设置 default-features = false 来关闭。
libafl_bolts
一些 rust 底层的工具
- core_affinity:绑定目前进程到 cpu cores
- SerdeAnyMap:A Map that can store typed values in a serializable fashion
- minibsod:dump当前进程状态
- LLMP:”low level message passing”,无锁的 IPC 通信方式
- Rand:随机数生成算法的其他实现,例如 RomuRand。
- ShMem:共享内存实现平台
- Tuples:编译期间的元组实现
libafl_sugar
包装了 LibAFL 的复杂 API,提供上层调用。无法模块化使用 LibAFL。
libafl_derive
允许 derive(SerdeAny) 宏,用来定义 Metadata 结构体
libafl_targets
与目标交互以及插桩的代码。使用 features flags 来控制
- pcguard_edges:使用 SanitizerCoverage trace-pc-guard 来跟踪覆盖率
- pcguard_hitcounts 定义了使用 SanitizerCoverage trace-pc-guard 的 hitcounts 来跟踪覆盖率
- libfuzzer:提供 libFuzzer 样式的 harnesses 的兼容层
- value_profile:提供 SanitizerCoverage trace-cmp hooks 功能
libafl_cc
打包编译器以及构建源码级 fuzzers 的库。
目前只支持 Clang 编译器
libafl_frida
以 Frida 为插桩后端。
libafl_qemu
以 QEMU 用户模式来针对 linux ELF 跨架构程序
可以在 linux 上运行并可以收集边的覆盖率
提供了大量的 hooks 以及 插桩选项
libafl_nyx
Nyx 是基于 KVM 快照的 fuzzer。添加其特性
libafl_concolic
Concolic fuzzing:模糊测试与符号执行结合。
BabyFuzzer
A Simple LibAFL Fuzzer
介绍了基本的部分:State,Observer,Executor。
首先,新建一个 Rust 项目,添加 LibAFL 作为依赖:
1 | cargo new baby_fuzzer |
在 [dependencies] 下添加 libafl 依赖,可以使用 git clone 下来的 本地 repo,也可以直接使用 crate.io 中的 LibAFL 版本。
该部分我们目标是 rust 代码,由于我们不想让目标程序直接 panic 退出,而是 abort 由 fuzzer 捕获。这里我们在 Cargo.toml 中标明 panic = "abort"
添加了一些其他的优化选项:
1 | [package] |
目标函数
定义一个函数,如果输入开头为”abc”就会 panic。ExitKind 用来告知 fuzzer harness 的 exit 状态。
fuzzer 如下:
1 | extern crate libafl; |
同时在 Cargo.toml 中添加 panic feature:
1 | [features] |
运行 cargo run -F panic,可以发现正常 panic 退出
生成模糊测试语料库
State 是 LibAFL中的一个重要组成部分,用于包含模糊测试过程中的输入数据。包含,输入的语料库,目前的 RNG 状态,以及测试用例的 Metadata。在 main 函数中我们创建一个基本的 State 实例。
1 | // create a State from scratch |
- arg1:RNG
- arg2:语料库,可以指定类型
InMemoryCorpus::<BytesInput>::new(),否则会在 executor 中自动推断。 - arg3:保存 “solution” 测试用例的语料库。
- arg4 & arg5:feedback 和 objective
另外一个需要的部分是 EventManager。其用于处理模糊测试过程中的一些事件,例如:添加测试用例到语料库。这里我们仅使用显示信息的 Monitor 实例:Fuzzer 实例用于修改模糊测试状态。其中一个是用于调度测试样例到 fuzzer 的 Scheduler。例如1
2
3
4
5
6// The Monitor trait defines how the fuzzer stats are displayed to the user
let mon = SimpleMonitor::new(|s| println!("{s}"));
// The event manager handles the various events generated during the fuzzing loop
// such as the notification of the addition of a new item to the corpus
let mut mgr = SimpleEventManager::new(mon);QueeuScheduler,这里是 FIFO 顺序提供 testcase。Executor 用于执行目标测试程序。在本例中,我们在进程中运行目标 harness 函数即可,因此为 in-process (无需 fork 子进程),因此我们使用1
2
3
4
5
6// A queue policy to get testcases from the corpus
let scheduler = QueueScheduler::new();
// A fuzzer with feedbacks and a corpus scheduler
let mut fuzzer = StdFuzzer::new(scheduler, (), ());InProcessExecutor。executor expects harness 返回 ExitKind 对象,因此我们在前面的 harness 函数要添加 ExitKind::Ok 。1
2
3
4// Create the executor for an in-process function
let mut executor = InProcessExecutor::new(&mut harness, (), &mut fuzzer, &mut state, &mut mgr)
.expect("Failed to create the Executor");
Generator:RandPrintablesGenerator生成可打印字符的字符串。1
2
3
4
5
6
7
8// Generator of printable bytearrays of max size 32
let mut generator = RandPrintablesGenerator::new(nonzero!(32));
// Generate 8 initial inputs
state
.generate_initial_inputs(&mut fuzzer, &mut executor, &mut generator, &mut mgr, 8)
.expect("Failed to generate the initial corpus");
完整代码如下:
1 | base ❯ cat ./src/main.rs |
根据反馈调整语料库
前面仅生成了8个输入用于测试,但是不会保存在语料库中,如果引发 crash 也不会保存在 crashes 中。(但很奇怪上面的代码直接运行还没有到输入给目标对象的逻辑,按理说不会引发 crash)
这里我们加入反馈机制来引导语料库向正确的格式变异。
Observer 实例可以记录一次模糊测试运行过程的信息并将其反馈给模糊测试器。我们使用 StdMapObserver,默认的observer,使用 map 跟踪覆盖率。在这里我们一个条件对应一个 map 的条目(手动插桩)
使用 static mut 变量表示 map,使用 signals_set 来跟踪覆盖率。
1 | // Coverage map with explicit assignments due to the lack of instrumentation |
然后直接基于 SIGNALS map 创建 observer
1 | // Create an observation channel using the signals map |
在 executor 中添加 observer 定义,这里应该是一个 tuples::tuple_list 类型。observer 记录一次运行的信息。
1 | // Create the executor for an in-process function with just one observer |
现在 fuzzer 可以观察到条件是否满足,我们需要对输入进行评价。也就是 Feedback:
Feedback 是 State 的一部分,用于为输入打分并且将其对应的执行视作 interesting。
Feedback 可以维护一个累积的状态,在这个例子中就可以保存在前面运行中触发的满足条件的信息。
使用 MaxMapFeedback,基于 MapObserver 的 map 进行查询。如果 observer’s 的 map 存在一个值大于目前的相同 entry 的值,则将其视作 interesting。
Objective Feedback 是另一种 Feedback,用于判断 输入是否是 “solution”。其会保存 testcase 到目标目录。这里我们使用 CrashFeedback 来告诉 fuzzer 如果 input 造成 crash 则是 solution 要保存到 ./crashes 目录。
更新 State 以及 fuzzer 的定义:
1 | // Feedback to rate the interestingness of an input |
网站上的链接有点老了,建议看 git clone 下来的 ./fuzzers 目录下的内容进行修改,例如这里就不能使用 StdMapObserver 定义 observer, 在 rust 2024 版本会报错。
对应 issue:https://github.com/AFLplusplus/LibAFL/issues/3185
模糊测试
运行目标程序,但是输出与上一个没有什么区别,因为 RNG 没有考虑我们保存的 interesting 的语料。需要 Mutator。
Stages 对于单个输入作操作。例如,MutationalStage 会将输入作变异执行多次 harness 函数。
作为 最后一步,我们创建 MutationalStage 使用 AFL havoc 的 mutator。
1 | // Setup a mutational stage with a basic bytes mutator |
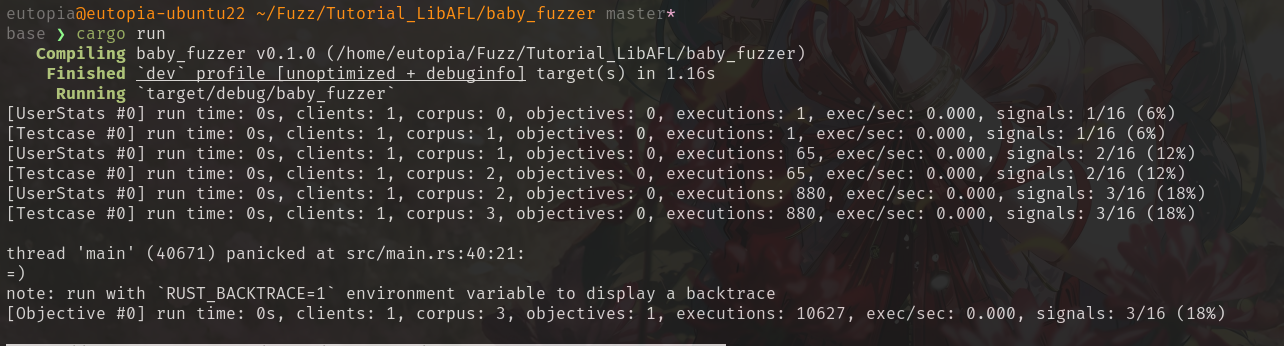
fuzz_loop 在每一次迭代会使用 scheduler 获取一个 testcase 送到 fuzzer,然后启动一个 stage。
运行结果如下:
核心概念
这里简要总结一下 LibAFL 中存在的一些术语:
Observer
用于记录每一次模糊测试 run case 的动态运行信息,包括覆盖率,运行时间,调用栈等等。同时会在执行前后挂钩,可以用于修改状态。
Fuzzer 会通过 Feedback 来获取 observer 的提供的信息,当然 Feedback 会将 observer 的信息汇总总结为 是否 interesting。
Executor
用于运行目标,包含运行目标的各种操作。
包含三种类型:
InProcessExecutor
效率高,如果存在堆漏洞,可能可以用另外一个堆分配器来避免错误(如果未开启ASAN)
ForkserverExecutor
基于 AFL++ 的 afl-cc 来编译 harness 函数。此时无法使用 EDGE_MAP,但是可以使用 shmem(Share Memory Region)来记录覆盖率信息。
只需要设置 __AFL_SHM_ID 环境变量即可:
1 | //Coverage map shared between observer and executor |
还可以通过 shmem 的方式来传递输入提高效率。参考https://github.com/AFLplusplus/AFLplusplus/blob/stable/instrumentation/README.persistent_mode.md#5-shared-memory-fuzzing
InProcessForkExecutor
在 harness 可能会损坏 fuzzer 时可以使用。
一样要使用 shmem map
1 | let mut shmem; |
Feedback
用于将 Observer 获取的信息进行总结为是否 interesting 的 bool。
可以有多个 Feedback, 通过 feedback_and | feedback_or 来拼接。(也可以加_fast后缀,会进行优化,如果 and 前面的为false,则直接返回 false)
Objective
Feedback 标识 interesting 的输入会保存在 corpus 中用于后续 变异。但是 Objective 保存的输入 直接保存在 crashes (或者说是 solutions) ,不会用于后续的变异。
Input
输入,包含常见的字节数组以及结构化输入,结构化输入需要序列化为字节序列输入到目标
Corpus
语料库,保存 testcase(输入+其运行的信息),包含 interesing input 以及 crashes input.然后会由 Scheduler 发送给 fuzzer 作为 testcase
这里放一个 crashes 的 testcase 的内容,具体种子+metadata+.<name>:
1 | base ❯ ls crashes/ -alh |
Mutator
变异一个或多个输入为新的输入。
Generator
从无到有的 Input 生成
在 Feedback-driven 中一般很少使用,但是在 Nautilus 中会用其来生成初始化输入以及在变异中用于生成的子部分。
Stage
处理从 Corpus 中获取的单个输入。
- Mutational Stage:变异并执行
- Analysis Stage:添加更多熵值
- Trimming Stage:修剪 testcase