OpenHarmony编译
学习一波,之前搞过hi3861开发板的oh源码编译,不过那个是轻量系统liteos-m,看看全量编译是什么情况。
环境
- Ubuntu 20.04虚拟机
- 已配置gitee ssh公钥
- sudo dpkg-reconfigure dash切换shell为bash
安装依赖
1 | sudo apt-get update; sudo apt-get install binutils; sudo apt-get install binutils-dev; sudo apt-get install git; sudo apt-get install git-lfs; sudo apt-get install gnupg; sudo apt-get install flex; sudo apt-get install bison; sudo apt-get install gperf; sudo apt-get install build-essential; sudo apt-get install zip; sudo apt-get install curl; sudo apt-get install zlib1g-dev; sudo apt-get install gcc-multilib; sudo apt-get install g++-multilib; sudo apt-get install libc6-dev-i386; sudo apt-get install libc6-dev-amd64; sudo apt-get install lib32ncurses5-dev; sudo apt-get install x11proto-core-dev; sudo apt-get install libx11-dev; sudo apt-get install lib32z1-dev; sudo apt-get install ccache; sudo apt-get install libgl1-mesa-dev; sudo apt-get install libxml2-utils; sudo apt-get install xsltproc; sudo apt-get install unzip; sudo apt-get install m4; sudo apt-get install bc; sudo apt-get install gnutls-bin; sudo apt-get install python3.9; sudo apt-get install python3-pip; sudo apt-get install ruby; sudo apt-get install genext2fs; sudo apt-get install device-tree-compilersudo apt-get install make; sudo apt-get install libffi-dev; sudo apt-get install e2fsprogs; sudo apt-get install pkg-config; sudo apt-get install perl; sudo apt-get install openssl; sudo apt-get install libssl-dev; sudo apt-get install libelf-dev; sudo apt-get install libdwarf-dev; sudo apt-get install u-boot-tools; sudo apt-get install mtd-utils; sudo apt-get install cpio; sudo apt-get install doxygen; sudo apt-get install liblz4-tool; sudo apt-get install openjdk-8-jre; sudo apt-get install gcc; sudo apt-get install g++; sudo apt-get install texinfo; sudo apt-get install dosfstools; sudo apt-get install mtools; sudo apt-get install default-jre; sudo apt-get install default-jdk; sudo apt-get install libncurses5; sudo apt-get install apt-utils; sudo apt-get install wget; sudo apt-get install scons; sudo apt-get install python3.9-distutils; sudo apt-get install tar; sudo apt-get install rsync; sudo apt-get install git-core; sudo apt-get install libxml2-dev; sudo apt-get install lib32z-dev; sudo apt-get install grsync; sudo apt-get install xxd; sudo apt-get install libglib2.0-dev; sudo apt-get install libpixman-1-dev; sudo apt-get install kmod; sudo apt-get install jfsutils; sudo apt-get install reiserfsprogs; sudo apt-get install xfsprogs; sudo apt-get install squashfs-tools; sudo apt-get install pcmciautils; sudo apt-get install quota; sudo apt-get install ppp; sudo apt-get install libtinfo-dev; sudo apt-get install libtinfo5; sudo apt-get install libncurses5-dev; sudo apt-get install libncursesw5; sudo apt-get install libstdc++6; sudo apt-get install gcc-arm-none-eabi; sudo apt-get install vim; sudo apt-get install ssh; sudo apt-get install locales; sudo apt-get install libxinerama-dev; sudo apt-get install libxcursor-dev; sudo apt-get install libxrandr-dev; sudo apt-get install libxi-dev |
获取源码
安装repo工具
1 | 获取repo工具 |
OpenHarmony主干代码获取:
1 | repo init -u git@gitee.com:openharmony/manifest.git -b master --no-repo-verify |
执行prebuilts:在源码根目录下执行prebuilts脚本,安装编译器以及二进制工具:
1 | bash build/prebuilts_download.sh |
编译源码
安装编译工具
想要详细了解OpenHarmony编译构建模块功能的开发者可参考编译构建指南。
安装hb
1 | python3 -m pip install --user build/hb |
设置环境变量,将hb加入到环境变量中
卸载命令:python3 -m pip uninstall ohos-build
编译
进入源码目录执行以下命令进行编译:
1 | 设置编译路径 |
或者直接运行build.sh进行编译
1 | ./build.sh --product-name {product_name} --ccache --target-cpu arm64 |
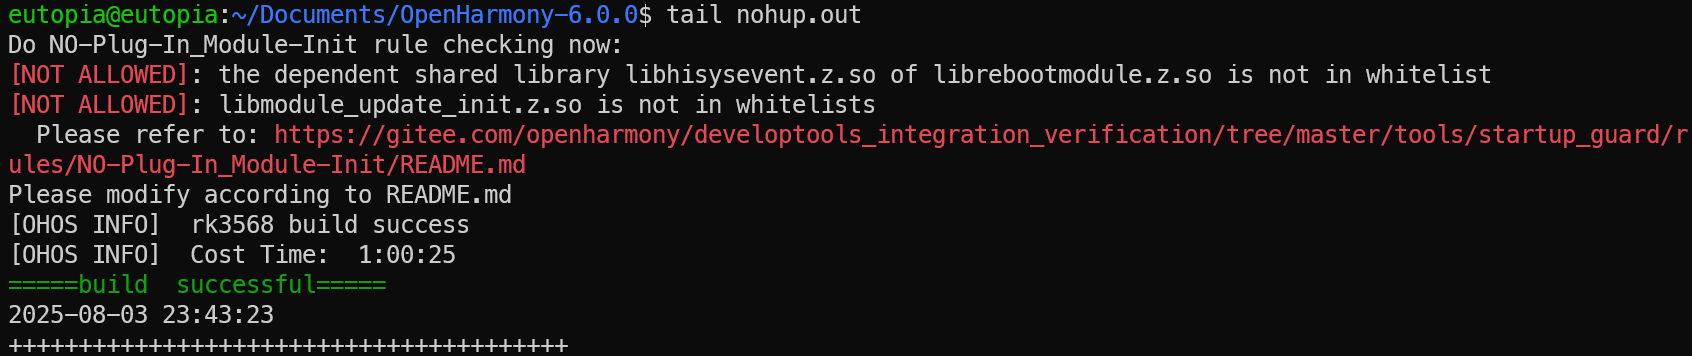
编译成功如下图所示,输出结果在//out/{product_name}/目录下:
编译模块
主要有两种编译方式,命令行方式和hb方式,这里以命令行方式为例。
模块可以使用“–build-target 模块名”单独编译,模块名可以在部件目录下的bundle.json里查看sub_component字段,例如drviers_peripheral_codec部件内容中sub_component字段定义了目标名:hdf_media_codec
1 | { |
编译命令如下:
1 | ./build.sh --build-target 模块名 |
也可以编译相应产品,以编译hispark_taurus_standard为例,编译命令如下:
1 | ./build.sh --product-name hispark_taurus_standard --build-target 模块名 --ccache |
还可以编译模块所在的部件:
1 | ./build.sh --product-name hispark_taurus_standard --build-target musl --build-target 模块名 --ccache |
编译模糊测试用例
参考: https://gitee.com/openharmony/testfwk_developer_test/blob/master/libs/fuzzlib/README_zh.md
可能需要对实际设备进行fuzz?
参考链接
本博客所有文章除特别声明外,均采用 CC BY-NC-SA 4.0 许可协议。转载请注明来源 Small Utopia!
评论